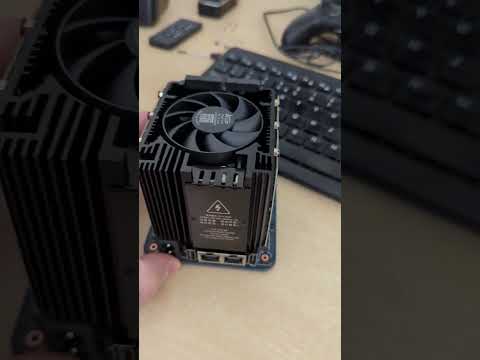
Beelink ME Mini Storage NAS
Beelink Me Mini and 6 x4 TB NVME devices
How about a short video.. I’ve had this since mid-august and been negligent on posting..
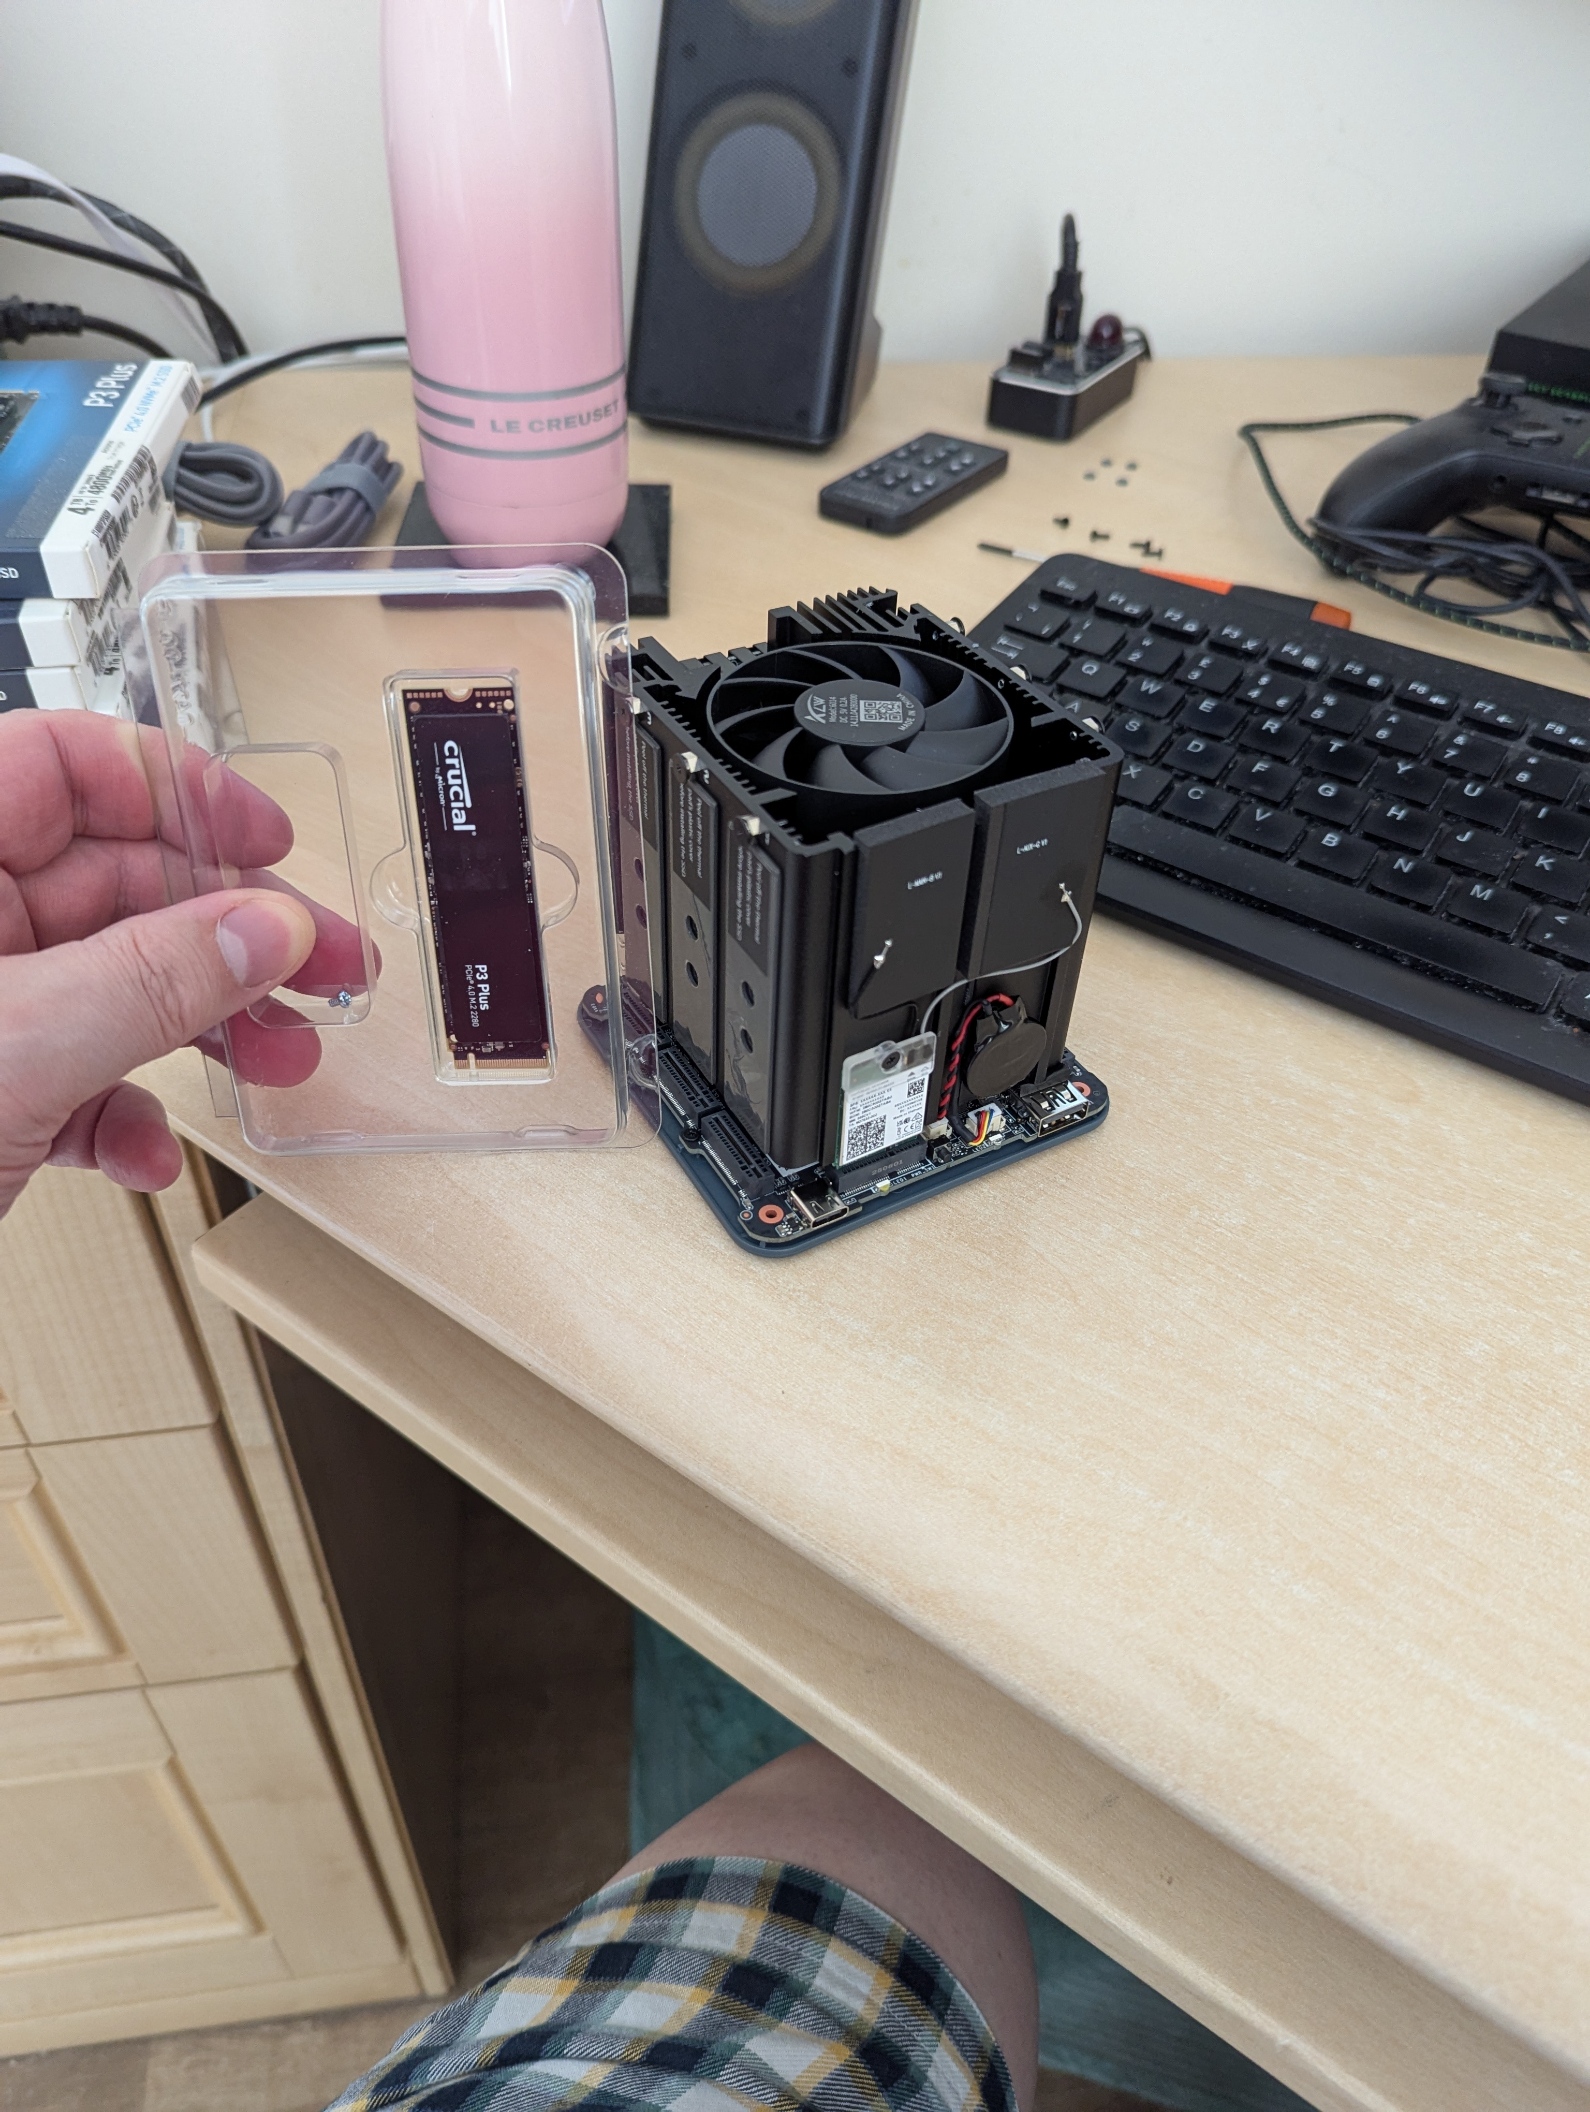
and a picture..
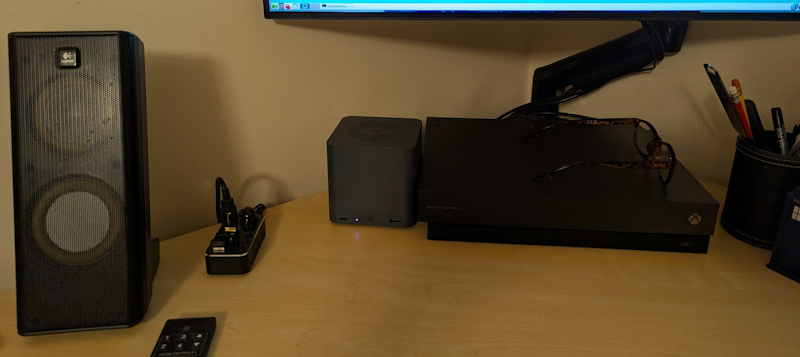
and what it looks like in-situ..
Here’s a link to the device where specifications can be found: https://www.bee-link.com/products/beelink-me-mini-n150
Home storage revolution - the journey from spinning rust to NVMe
I’m not someone that watches much in the way of TV or films. Nevertheless I have decades of CDs, DVDs, BluRays, scanned documents etc. CD media is ripped lossless and the rest are ISO image rips. As time goes on I’m less concerned perhaps, I can always grab a new copy of something and stream it but nevertheless I want a permenant digital home and maybe one day rid myself of the physicals.
Previously my ancient N54L HP Microserver hosted a 4-disc spinning rust RAID 5 array. The array comprised x4 4TB discs so a storage capacity of 12 TB. It was always a concern that I didn’t have a true backup, although my main PC has enough storage to have a copy. That problem is now solved.. the price point was finally crossed to invest in NVMe storage. To that end I have the new Beelink ME Mini with x6 Crucial P3 Plus SSD’s, 4TB M.2 NVMe and I’m running RAID-Z2 (ZFS Raid 2 mode). I can now re-puprose the N54L as genuine backup! Hooray!!
OpenSuSE Leap 16 and ZFS
As a long-term user of OpenSuSE since the late 1990s it wasn’t hard to move to Leap 16.0 - my N54L runs tumbleweed just fine and that’s a very old bit of kit. I want a bit more robustness for this NAS so opted for Leap 16, even though Leap 16 itself is still new. It’s not an article about Leap but ditching Yast.. not for the faint-hearted! Anyway..
ZFS is not available in zypper, something to do with the copyright model I believe. Details on setting it up can be found here: https://openzfs.github.io/openzfs-docs/Getting%20Started/openSUSE/index.html. I am using the Beelink’s on-board 64 GB eMMC storage for the OS install. I decided to go for RAID-Z2 and for more details on this RAID 6 equivalent, please look here: https://www.diskinternals.com/raid-recovery/what-is-raidz/ . I think 64GB is plenty for the OS and all the containers I’ll want to be developing and running.
How do I have RAID-Z2 configured
sudo zgenhostid
A very loud “DO THIS BEFORE ANYTHING ELSE” because when your device ID moves from under you, your zfs pool may need re-attaching. Every reboot. Annoying ++. And this isn’t mentioned anywhere. This command creates /etc/hostid which is a unique ID for the host; zfs uses that to manage/understand what host machines have ‘attached’ the storage which is quite important for managing devices safely. I didn’t know this for quite a while, being bombarded with status: Mismatch between pool hostid and system hostid on imported pool.
This pool was previously imported into a system with a different hostid,
and then was verbatim imported into this system.
action: Export this pool on all systems on which it is imported.
Then import it to correct the mismatch..
It’s import to start using device UUIDs. This is something which burned me when I first created a tank, never having used ZFS before. It’s a good thing really and I had been negligent in modern linux ‘overlooking’ the right thing for the old-school simplicity. Anyway the following contains a zfs raid-z2 tank called storage comprised of my 6 individual disks.
richard@tardis:~> sudo blkid | egrep "nvme. *LABEL"
/dev/nvme0n1p1: LABEL="storage" UUID="8282823328310439646" UUID_SUB="15490925081664485484" BLOCK_SIZE="512" TYPE="zfs_member" PARTLABEL="zfs-7f8ade18d14145f2" PARTUUID="1818790e-b6c8-aa4f-ae51-1da8f619208b"
/dev/nvme3n1p1: LABEL="storage" UUID="8282823328310439646" UUID_SUB="12519238481199258343" BLOCK_SIZE="512" TYPE="zfs_member" PARTLABEL="zfs-97bed22482358cf0" PARTUUID="0327ff1a-0177-d344-a16f-bc774b891249"
/dev/nvme2n1p1: LABEL="storage" UUID="8282823328310439646" UUID_SUB="10957071072048538514" BLOCK_SIZE="512" TYPE="zfs_member" PARTLABEL="zfs-edc239263a007389" PARTUUID="d75ccd43-6eb2-ee47-a5dc-4204c895ffff"
/dev/nvme5n1p1: LABEL="storage" UUID="8282823328310439646" UUID_SUB="649089288836798833" BLOCK_SIZE="512" TYPE="zfs_member" PARTLABEL="zfs-ae358d8e14bd0471" PARTUUID="c203fd3a-0827-394e-8c05-d1350426795c"
/dev/nvme1n1p1: LABEL="storage" UUID="8282823328310439646" UUID_SUB="18191126581936446428" BLOCK_SIZE="512" TYPE="zfs_member" PARTLABEL="zfs-48bb97ad77de7094" PARTUUID="acb115a2-9249-c442-8d84-a48c9f53d490"
/dev/nvme4n1p1: LABEL="storage" UUID="8282823328310439646" UUID_SUB="4492251238282370337" BLOCK_SIZE="512" TYPE="zfs_member" PARTLABEL="zfs-45bc3743a3b426c0" PARTUUID="0c582dde-7605-8844-b34f-bd1c588e5f36"
More-or-less created with sudo zpool create storage raidz2 UUID1 UUID2 ... . Within this raid-z2 pool I created three mounts: data, dev and media.
richard@tardis:~> sudo zfs list
NAME            USED  AVAIL  REFER  MOUNTPOINT
storage        8.36T  6.06T  44.0K  /storage
storage/data   28.0G  6.06T  28.0G  /storage/data
storage/dev    1.90G  6.06T  1.90G  /storage/dev
storage/media  8.33T  6.06T  8.33T  /storage/media
These pools each have different attributes. That’s one of the appeals - I don’t really want to give any area a finite maximum size, they can all grow as required, but at least they can grow with specific attributes - for instance, storage/media has lz4 compression and a record size of 1M, and even though ISO DVD images are well-compressed this still gives some additional benefit. Mostly it is just the record sizes which vary (64 KB for dev - small source code files, 128KB for data - a compromise, stuff like a Postgress data area will live there).
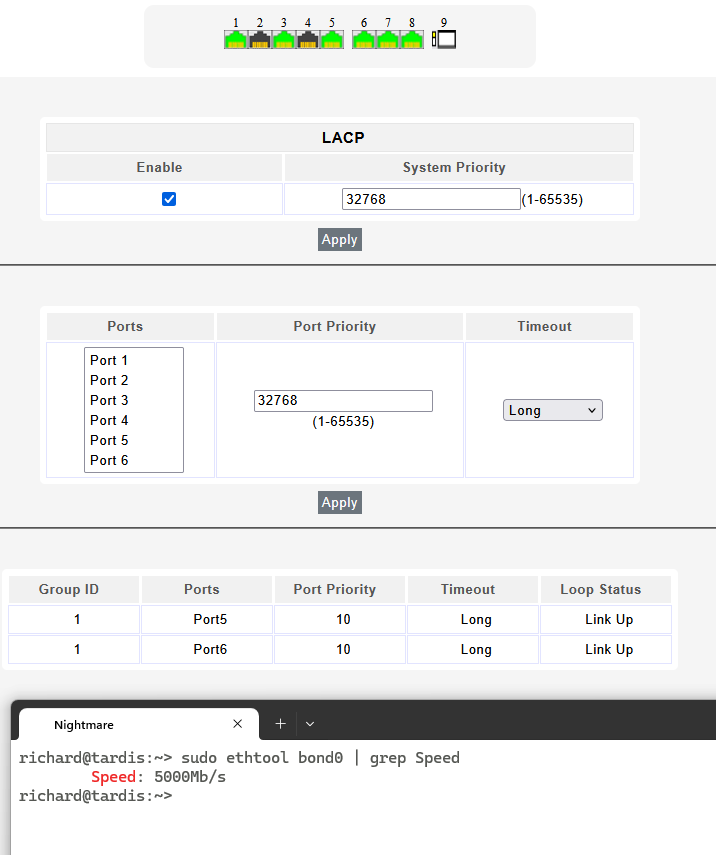
A small note on the network
You will notice the terminal reporting a bonded speed of 5 Gbe. This required setting up a LACP-active trunk in my nicgiga switch and making sure LACP was active. I had a power outage a few days ago and these settings did not survive! WHY! Anyway.. easy enough to configure again.
x2 2.5 Gbe ports - how fast can it go with Raid-Z2!
My main PC has a 2.5 Gbe port and my ancient N54L also has 2.5 Gbe courtesy of a nicgiga 2.5Gb PCIe Network Card - althought the 3Gb/s is the SATA bus limit. Additionally I have a 2.5 Gbe nicgiga switch. On the Beelink I’ve opted to bind the network interfaces. This means in principle I can test flat-out performance for reading, writing and combinations thereof and find out if a N150 will pull its weight or if it is left wanting in a raid-z2 configuration. I should point out that writing to the N54L is not particularly quick even if it is to just /dev/null. Also note the use of samba for all file transfers (scp has limitations on transfer bandwidth). Oh and this isn’t particularly scientific but it’s good enough for me!
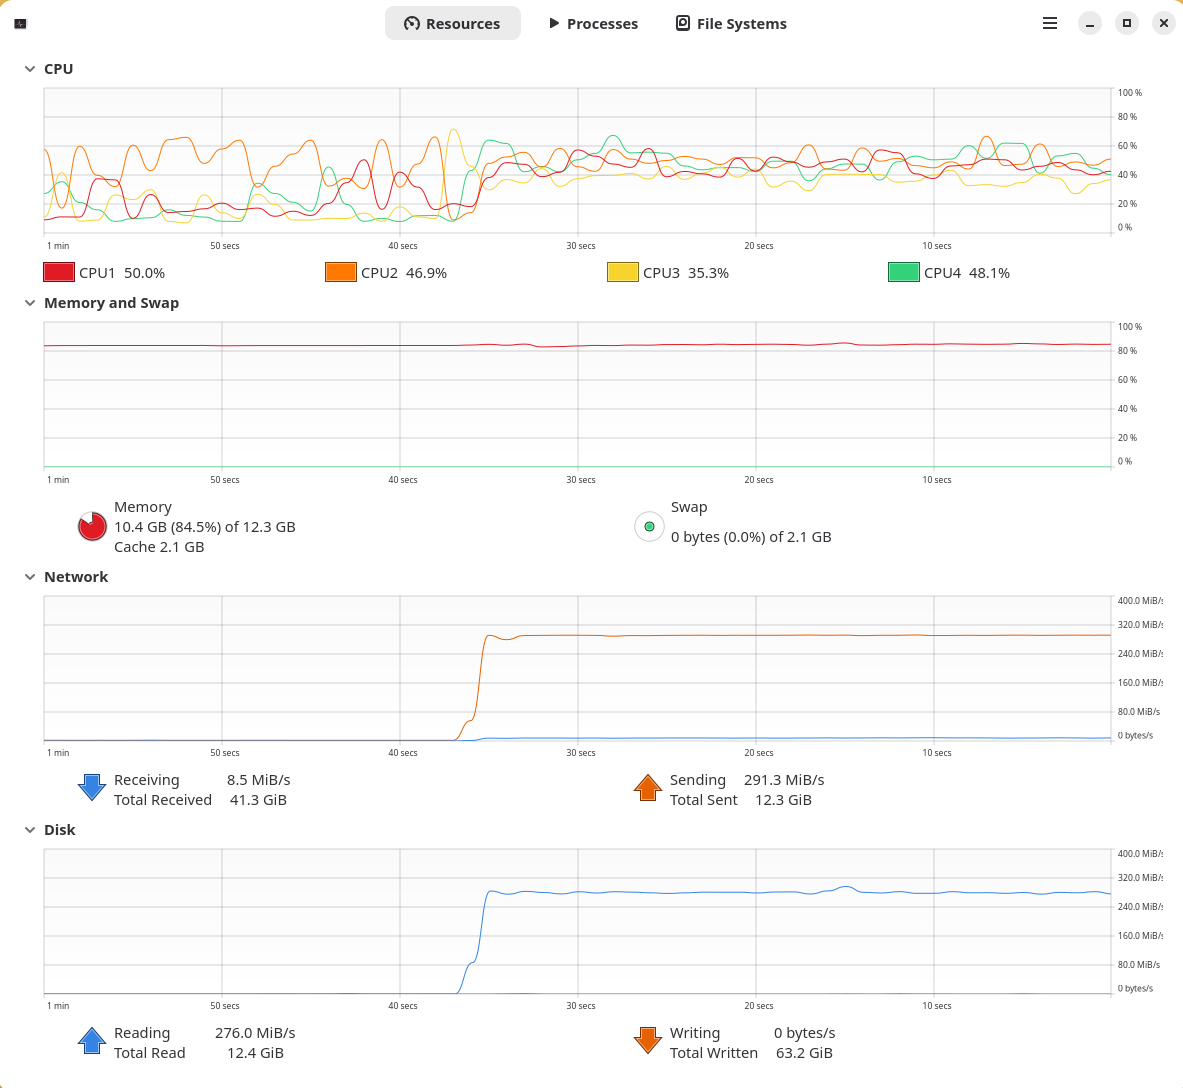
Copy from Beelink to PC
The majority of my use-cases are reading/writing from my PC at a peak speak of 2.5GBe. Annoyingly that graphical system resource monitor takes up more resource than it should but this isn’t a scientific test and not should it be.
For reading a file it works and works flat out.
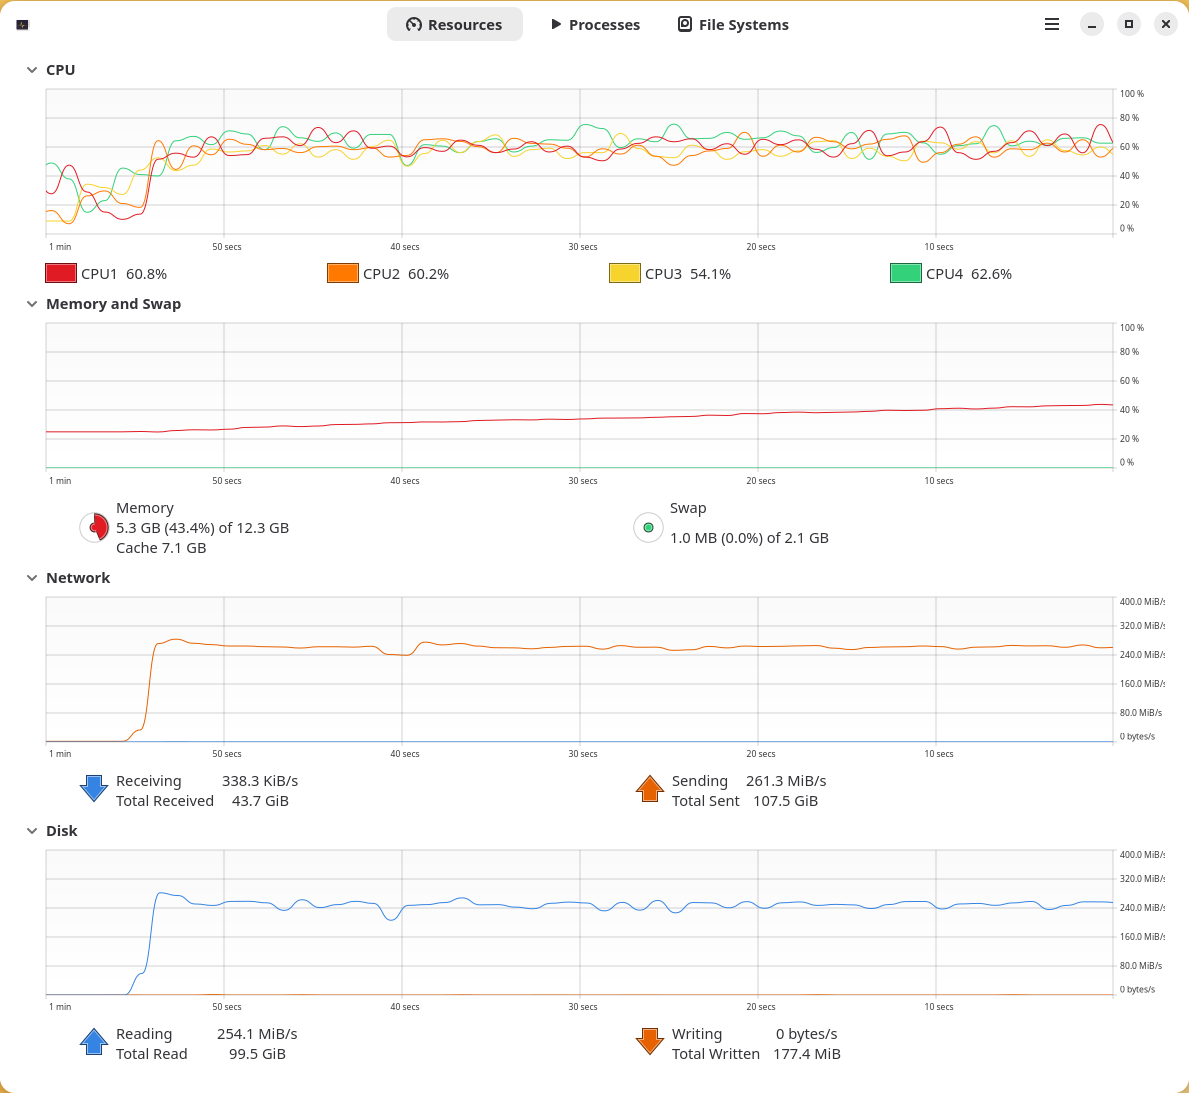
Copy from PC to Beelink
Pleasingly this is also pretty optimal. Not quite the flat sea of above, and as a guess it is showing the system working quite hard performing all the write raid calculations as well as compression. It’s a big work load but I’d say yes, that’s good.
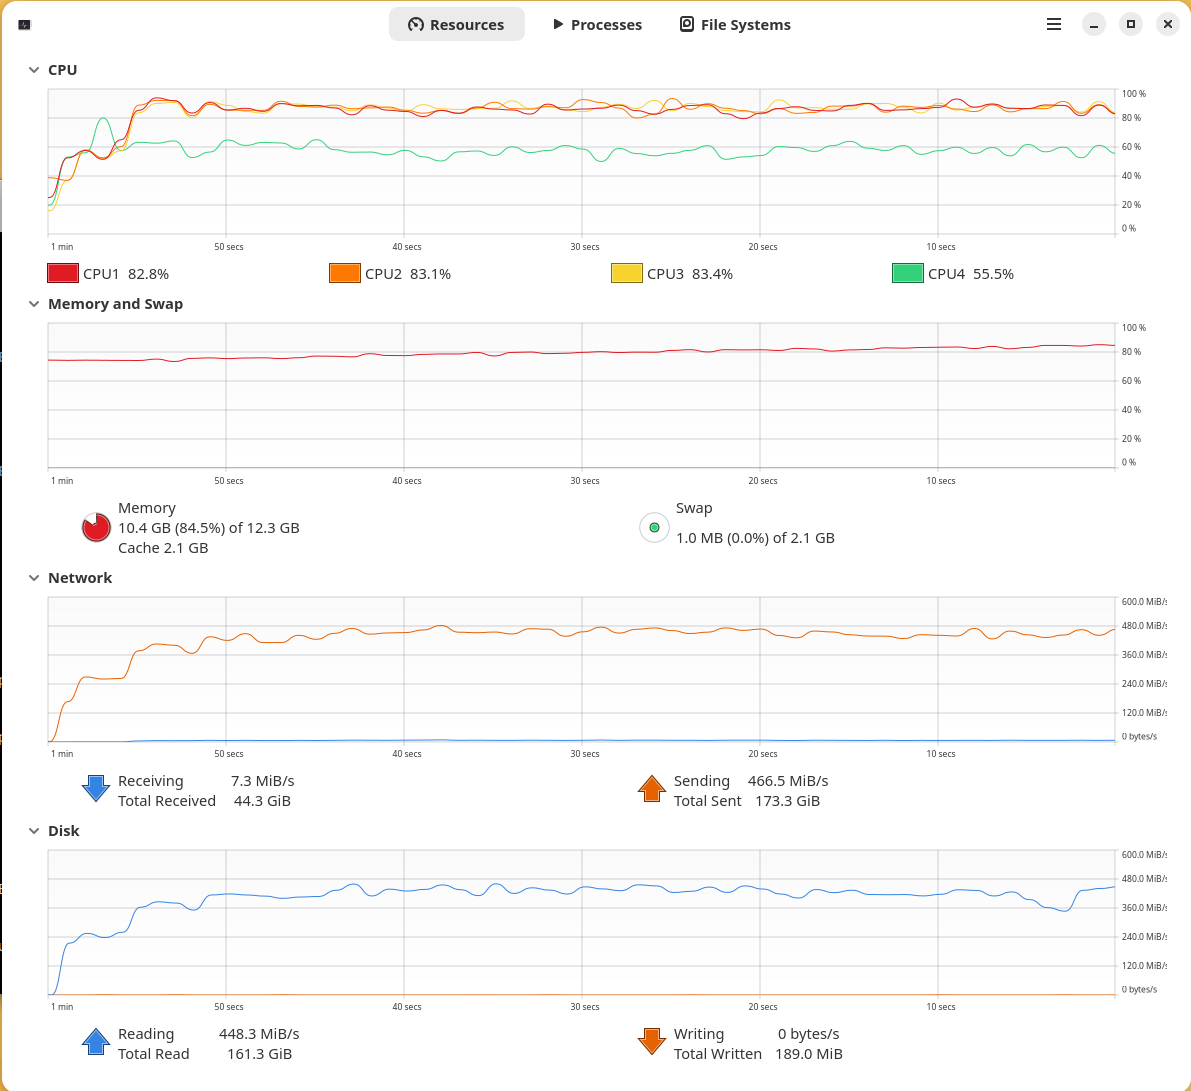
Copy from Beelink to Microserver
By writing to /dev/null I can also drive the microserver flat-out - it’s not quite keeping up with the bandwidth of the PC but a really good result.
Copy from Microserver to Beelink
This doesn’t tell me anything about the Beelink, but it tells me the maximum I can expect from my poor little ancient N54L.
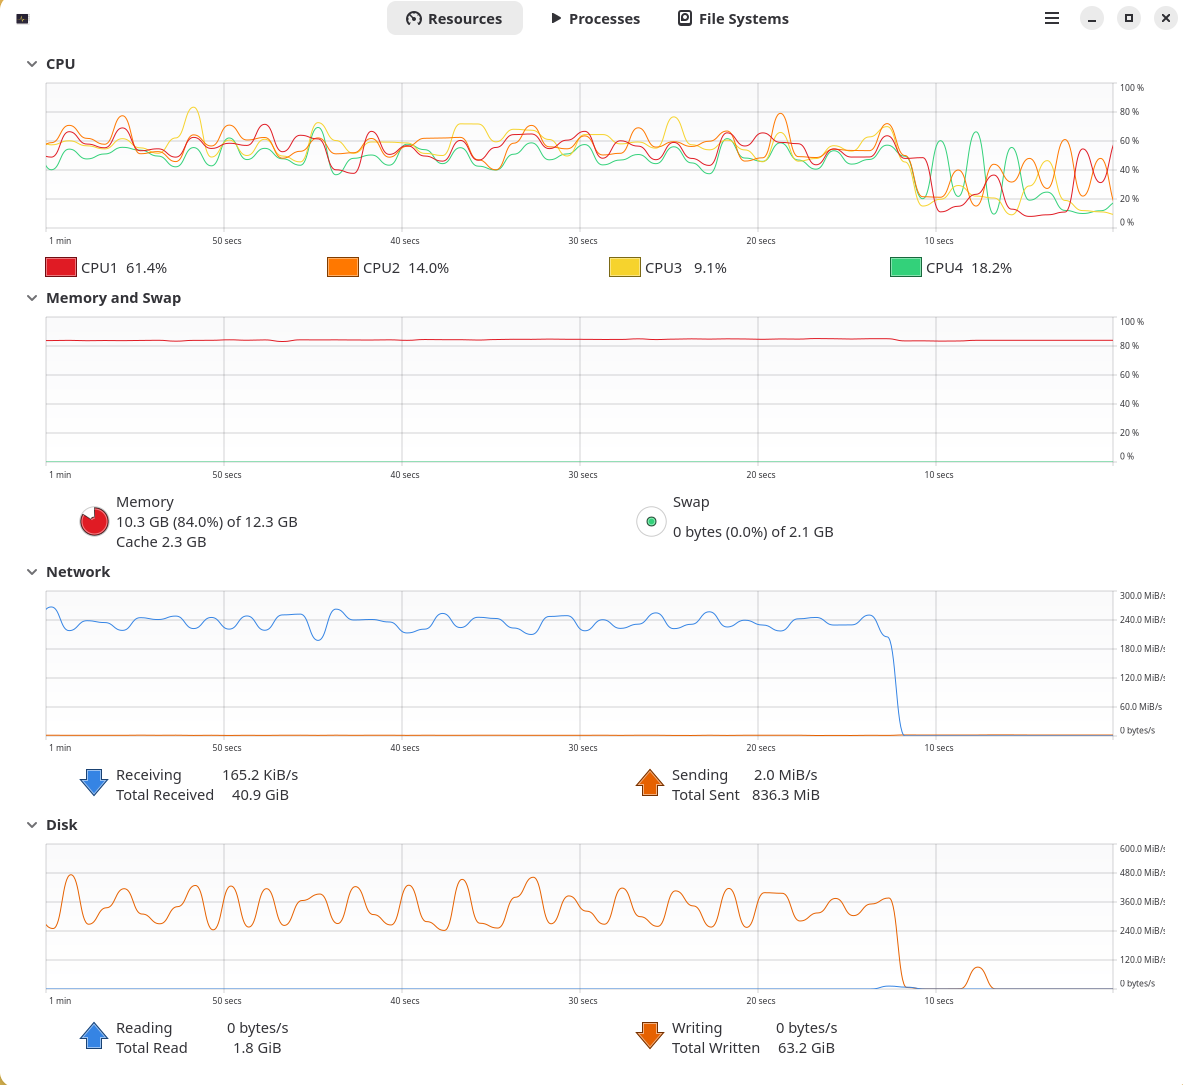
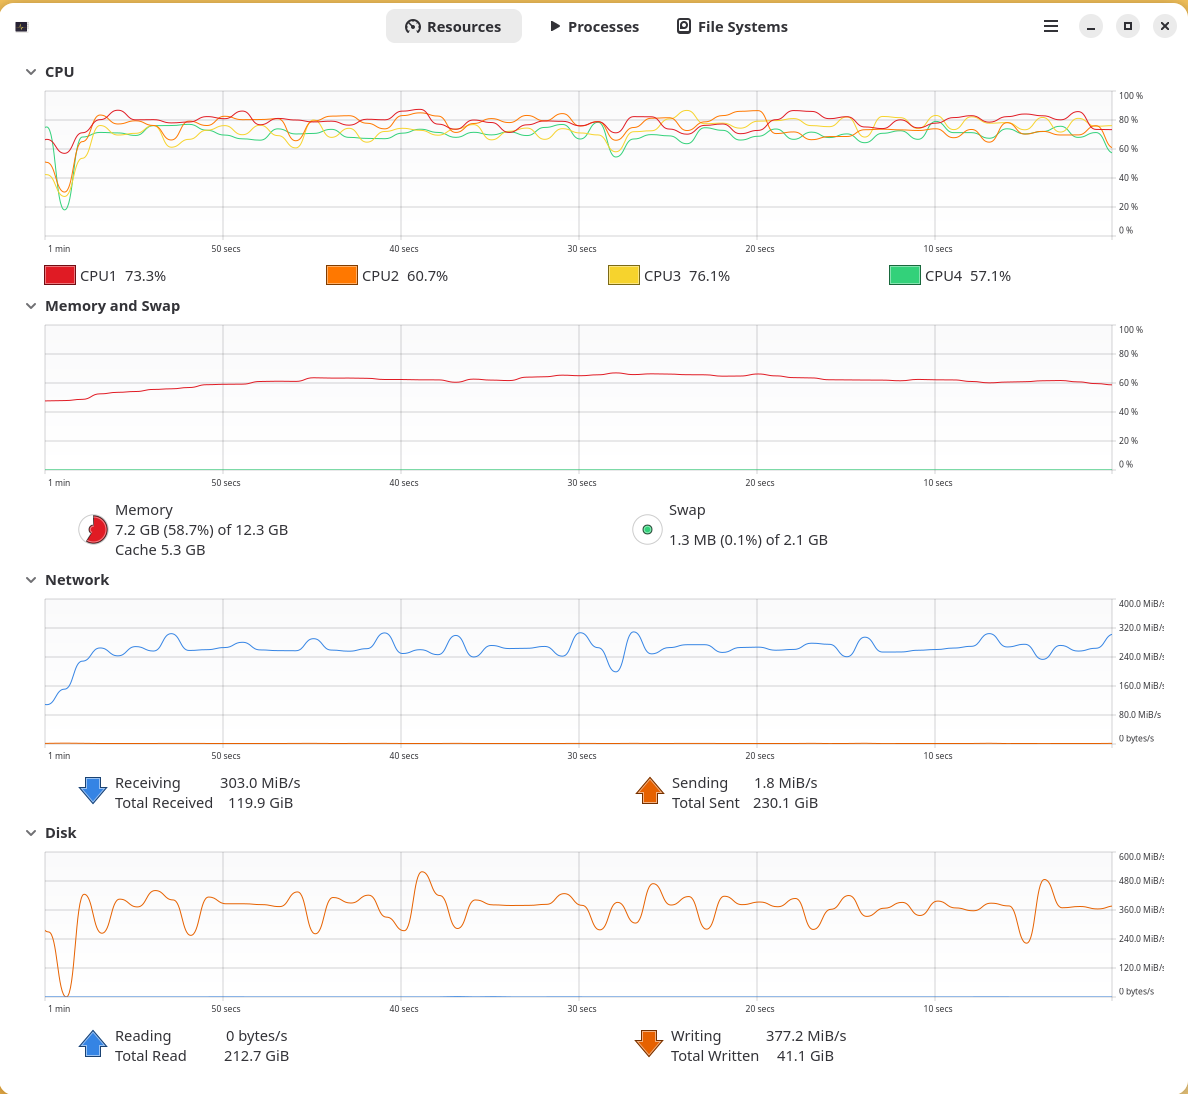
Copy from Beelink to both Microserver and PC
Seperate files were in use to prevent any kind of caching phenomena. For the first time it shows a weakness.. it’s still pretty good to be honest, and isn’t something I would do often (or if I did I’m not going to care that much about performance anyway). It was exciting seeing the home network for the first tim attain such speeds! It appears if there is some capacity left, but to be honest, I don’t know what the theoretical speed of a x2 2.5GBe bonded active-lacp connection should be anyway. Still, it’s not bad!
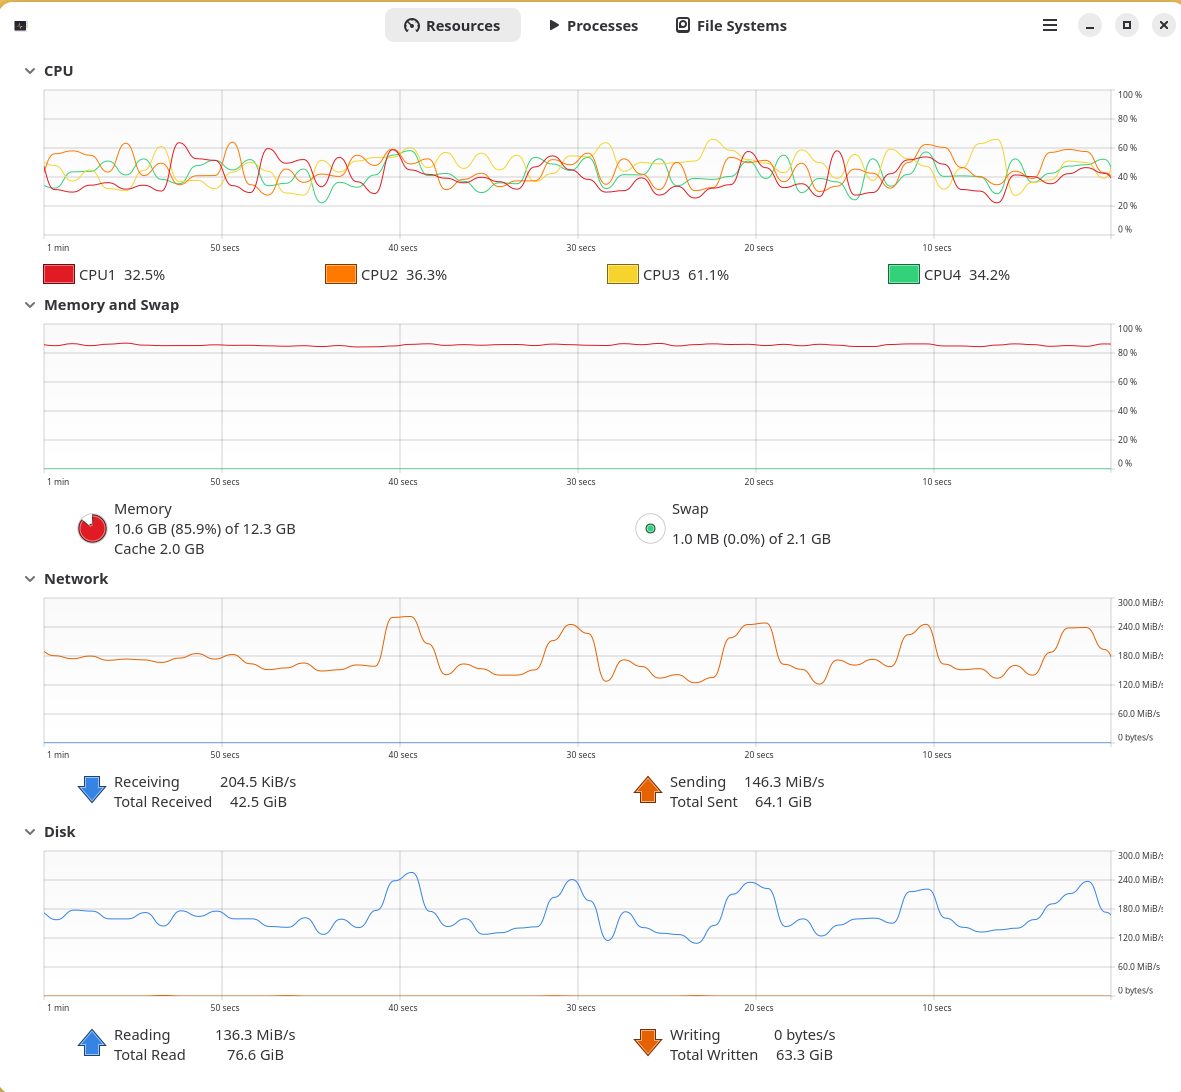
Copy from Microserver and PC to Beelink
Final test is two seperate files being sent to the Beelink, one from the PC and one from the Microserver. This is the test that shows the limitation of the N150.. it just has too much to do and the CPU load average was well in excess of what the box can cope with. Saying that, the likelyhood of me writing simultanesously at 2.5 Gbe speeds is virtually none. I’m also quite confident if it wasn’t for raid it would have no trouble maxing the whole thing out.
Cost
Beelink Me Mini was oredered mid-July and cost £155.06. A fx fee of £4.64 was also applicable so it seems. The storage was purchased at discount during the Amazon Prime Day sales, costing £377.98 per pair of NVMe’s. In total: £1,293.64.
Conclusion
I was a little fearful of the cost - but unlike my microserver that I switch off because of noise and spinning rust, this device has been on all the time barely causing a whisper. I would have perferred 16 GB of memory to match my microserver but it won’t stop me spinning up small containers and the ilk. I can now re-purpose my microserver as an actual backup and overall I’m pleased I’ve done this.